Monday, February 22, 2016


Knife Skills: Different Types of Cuts


types of cutsUpdated February 22nd, 2015

Different Types of Knife Cuts

There are many different types of cuts and while you may not use all of them, it's important that you know and understand them. Having the knife skills and know-how to cut a brunoise, matchstick, or batonnet will not only help you improve your knife skills, but also improve the visual appeal and professionalism of the food you cook.
The Julienne
The Julienne Cut
If you're like most people, you will likely chop your items as fast as possible without knowing or understanding why it's important to cut properly. The first reason is uniformity. Take a carrot, for instance. It goes from very fat to very thin and most people will use a coin cut to slice it. This leaves very large and very small pieces in relation to itself. Why is this important? Well, large pieces take longer to cook (Especially when it comes to carrots). Uniformity in cutting ensures that you have even, predictable cooking times. Nobody wants carrots that are mushy and hard at the same time!
The second reason is aesthetics. Properly cut items look professional and have that visual appeal. Much of your appetite and the appetite of others stems from the visual appeal of your dish. The presentation is of the utmost important and a large percent of the satisfaction that people get from food comes from their eyes. People eat with their eyes, and it's important to never forget that!

Top Professional Chef Knives

Wusthof Classic 8" Chef Knife

Global G-2 Chef Knife 8"

Shun Chef Knife 8"


The Basic Types of Cuts

Taking into account that much of the reasoning behind the different cuts tie into the ability to cook accurately first, and aesthetically second is a foundational skill. Keeping these in mind will help you determine what type of cut is appropriate for the dish you are cooking and help you become a better cook. Obviously a diced carrot takes longer to cook than an equally sized dice of, say, celery. Using your knowledge, you will know that you will have to precook the carrots first before adding the celery!

Once you get into the routine of making your own stocks you will learn that much of the waste will be transformed into delicious stocks.

Squaring Off Your Items

squaring a carrot
Squared-Off Carrot Segments
Before cutting an item, we're going to learn how to square off the item you're about to cook. The idea is to get the item to a stage that allows your cuts to be done uniformly. We will use the carrot as an example, as it is the most common abnormally shaped item you will be using. A lot of the skills you will learn will leave you with a bunch of waste. This is not as bad as you think! Once you get into the routine of making your own stocks you will learn that much of the waste will be transformed into delicious stocks. These techniques put form and perfection first. Many chefs and cooks will tell you this method produces TOO much waste. While it is true, remember that cutting and chopping has its own "Pick two of three" catch 22. This is:
Speed, Waste, Uniformity
If you want speed and low waste, you'll lose uniformity.
If you want low waste and uniformity, you'll lose speed.
If you want speed and uniformity, you'll have more waste.
Understanding these conditions, you will come to settle on a spot that is comfortable to you. Many industry professionals will settle somewhere in the middle.Let's get started on squaring off your carrot:
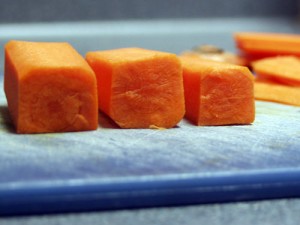
Start by peeling the carrot, removing the ends. Then, slice the carrot into segmented lengths of 4cm (2in.). Taking one of the segments, you will slice one end to produce a flat surface. This surface will then be laid flat, and you will continue the process for remaining sides. Your carrot segment will come out looking like a 3-dimensional rectangle. Now that you've squared off your carrot, you're ready to start producing the type of cut you're after.

The Julienne Cut

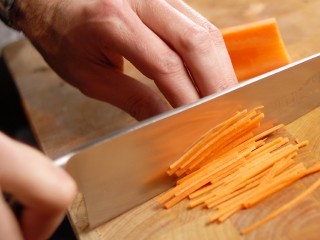
The julienne is a type of cut that is stick-shaped and very thin. Cut from a squared off item, you will then slice that item length-wise at a thickness of 1-2mm (1/16 in) leaving you with thin rectangular cuts. Then, take the thin slices and apply the same technique. You will end up with Julienne (Or matchstick) cuts!
Dimensions: 2mm X 2mm X 4cm (1/16in X 1/16in X 2in)

The Brunoise Dice

Brunoise Dice
The Brunoise Dice
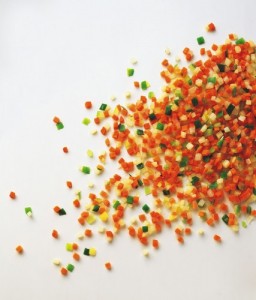
The Brunoise dice is the smallest dice you can have. While you can mince to a smaller dimension, this method refers to the smallest uniform size available for dicing. This method is simple and only adds an additional step to the Julienne method. Take your julienne cuts and bunch them up with your hand. Then cut the julienne into equally shaped dice. That's it! While simple, it does take a long time to master. Get crackin'! Great for Soups
Dimensions: 2mm X 2mm X 2mm (1/16 in X 1/16 in X 1/16 in)

The Small Dice

The small dice are similar to the brunoise, but it is slightly larger. Start by following the steps to Julienne your item. You want to slice your squared-off item at a thickness of 3mm. Now it's only a matter of finishing off the dice as you would the Brunoise!
Dimensions: 3mm X 3mm X 3mm (1/8 in X 1/8 in X 1/8 in)

The Batonnet

BatonnetCut
The Batonnet Cut
You're probably starting to notice a pattern here. We start with squaring off our item, slicing it to the thickness desires, and then going from there. The batonnet is no different, but what the purpose of knowing these cuts are they are standard sizes that you'll see in most professional recipes as well as recipes posted on TheCulinaryCook. Let's continue. The Batonnet is no different, and we are aiming for a larger stick-cut. The batonnet is used when serving a larger potion of an item such as a vegetable side, to gain height in your dish, or to provide imposing linear appeal to an otherwise linear-absent dish.
Dimensions: 6mm X 6mm X 6cm (1/4 in X 1/4 in X 2 in)

 The Medium Dice

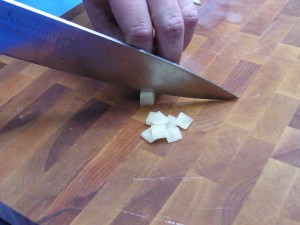
The medium dice type of cuts are derived from the Batonnet and the only added step is slicing the batonnet to produce cubes. This size is called a Medium Dice.
Dimensions: 6mm X 6mm X 6mm (1/4 in X 1/4 in X 1/4 in)

The Baton

The baton type of cuts are the largest stick-cut you can cut. It is used for crudites and for presentation purposes. While not used as much as the rest, it is the foundation for the more common Large Dice.
Dimensions: 12mm X 12mm X 6cm (1/2 in X 1/2 in X 2-1/2 in)
The Large Dice Cut
A Large Dice Cut

The Large Dice

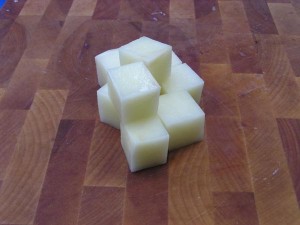
The large dice types of cuts are primarily used for stews, long-cooking dishes and for mirepoix in stocks. The large dice is important, because it is relatively quick, has a great imposing nature and looks professional. When cutting a large dice, you will tend to have a higher waste when trying to get nicely cut pieces using the method describing how to square off your item. Remember when doing any cutting or dicing to use the method best suited for your dish.
Dimensions: 12mm X 12mm X 12mm (1/2 in X 1/2 in X 1/2 in).

The Paysanne Cut

The Paysanne Cut
A Paysanne Cut
The paysanne types of cuts are included here to show you that while cubed items are common, sometimes you would prefer a slimmer, flat, square item. This is called the Paysanne. This is achieved by creating your desired stick-cut size, then slicing thinly to produce a thin square. Typically used for larger cuts, this method can be applied to smaller cuts and dices as well.
Dimensions: 12mm X 12mm X 3mm (1/2 in X 1/2 in X 1/8 in)
There are different types of cuts that you can use as well.

The Chiffonade

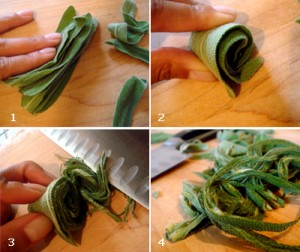
The chiffonade types of cuts are used when slicing very thin items such as herbs or leaf vegetables such as spinach. Cutting en chiffonade is a really simple process. Start by stacking the items you are looking to slice. Then roll up the items, producing a cigar-shaped roll. Once it's rolled, start slicing to produce a nice chiffonade suitable for garnishing and other purposes.
Additional Resources

Chiffonade Slice
The Chiffonade Method, photo by Flickr user Lifeflix


How to Attract Tourists


Here are four simple strategies your tourism business can consider to bolster your appeal overseas.

1. Think eco-tourism/adventure travel


Canada is emerging as a global destination for eco-tourism and adventure travel. The country is a natural draw for international visitors seeking authentic wilderness, adventure and cultural experiences.
Canada has a reputation as an uncrowded and unspoiled holiday destination with a wide diversity of wildlife. Its natural environment also appeals to visitors seeking an adrenaline rush with such activities as windsurfing, white water kayaking, skiing and rock climbing.
Consider how you can take advantage of the eco-tourism and adventure travel opportunities in your area. Even if your business is urban based, you can appeal to foreign visitors simply by helping them find local eco-tourism activities

2. Give your website global reach

You can benefit from customizing your website to your target market with simple visual aids such as country flags.
Showing your prices in local currency can help you connect with international visitors and increase their ability to compare prices. In the end, you want to increase user confidence and comfort.
As well, it's important to provide international travelers with basic information on Canada, such as weather, currency, local customs and cuisine

3. Make your business multi-seasonal

Any tourism operator today knows that building an all-season capacity into your business drives growth and revenues. And this is particularly important for attracting international visitors.
If you're looking for ways to make your business an all-season affair, the first step is to assess the potential year-round activities in your area. Are there cultural activities, such as music festivals, that would attract visitors? Are there seasonal outdoor activities year round? You might consider adding a new dimension to your tourism business, such as offering spa services in the winter season.
You could also team up with other local tourism businesses to share services and reduce your risk.

4. Consider exhibiting at tradeshows

It's a marketing rule of thumb: Person-to-person contact can generate sales. And that's precisely what attracts thousands of tourism businesses and travelers to international tradeshows.
If you're shopping around for a tradeshow to exhibit your business, ensure that you choose one that gives you the best exposure and avoid untested venues. As well, prior to the show, be sure that your trade show team is properly trained to sell your business.
There are numerous shows, associations and government organizations that can help you in the international arena, and here are just a few:
The Canadian Tourism Commission, a private/public partnership dedicated to sustaining a viable and profitable tourism industry, promotes Canada’s extraordinary experiences in 12 countries around the world: Australia, Brazil, China, France, Germany, India, Japan, Mexico, South Korea, the UK and the US.
Rendez-vous Canada is Canada's premier annual international tourism industry marketplace, bringing together selected international buyers and media to meet invited suppliers of Canadian tourism products, services and information.
Canada’s West Marketplace is a tourism trade show in Western Canada that brings together BC and Alberta tourism suppliers with International tourism buyers in one location. It has an excellent track record, allowing tourism suppliers the opportunity to showcase their products to key decision makers from Europe, Asia Pacific, and North America.


Table Napkins Folding 


Napkins serve a practical purpose for most of us, but they can also be a very important part in the scene of a well-set table. Adding that special touch of decoration, napkins can add to the visual effects placed on the table such as centerpieces or other decorative objects. The following instructions will turn napkins into accessories:


1. Fold square napkin in half
2. Accordion fold 2/3's of the napkin
3. Fold pleated side flat
4. Fold in half upward
5. Fold corner down


1. Bring top and bottom edges to center leaving 1" gap
2. Pleat sharply
3. Pinch center together, secure with ring
4. Fan


1. Fold corners to center
2. Fold corners to center again
3. Repeat a 3rd time
4. Turn over and fold to center again
5. With pressure in center, pull first 4 petals from back, than 8 more, 12 points in all


1. Fold napkin in half forming large triangle
2. Bring bottom corners up to top point
3. Fold bottom to top
4. Fold same point down leaving 1" up
5. Turn bottom point under to back
6. Turn right and left corners to back and tuck one into the other
7. Turn from points down-thn stand up


1. Fold in half to form large triangle
2. Turn up 1" hem
3. Flip over
4. Roll up tightly, tuck corner into hem


1. Fold napkin twice to form square
2. Take 2 top layers and roll down half-way
3. Turn corners back


1. Pleat square napkin from top to bottom
2. Secure center with finger and fold in half
3. Place in glass and fan out top


1. Fold napkin in half, and repeat until quartered
2. With loose edges at bottom, fold in half, bottom to top
3. Turn corners down
4. Fold bottom tips under to back
5. Fold in half, lengthwise
6. Gripping tightly, pull edges up and arrange them


water lilywater lily

 1) Place the open napkin in front of you 2) Fold the four corners into the middle of the napkin 3) Repeat the process a second time. 4) Turn the napkin around. 5) Fold again the four corners into the middle of the napkin. 6) Pull gently out the... [more ] http://www.fold-a-napkin.com/186/all_napkins/water-lily-fold/

fanfan

Fold a napkin into a fan. Napkin folding: Fan – Folding instructions Place the open napkin in front of you Fold the bottom left corner of the napkin to the top right corner Place the napkin in front of you so that you have the closed side of the napkin on the bottom side. Fold the bottom side of the napkin about 4 cm up. Start with one side to... [more] http://www.fold-     napkin.com/409/summer/facher/

PeakPeak

Napkin Folding: peak- Folding instructions 1) Place the open napkin in front of you 2) Fold the napkin diagonally in the middle to a triangle 3) Put the napkin in front of you, so that the closed side is above 4) Fold the upper right corner down to the head of the triangle 5) Fold the upper left corner down to the head of the triangle 6)... [more] http://www.fold-a-napkin.com/407/summer/peak/

liliy (also called crown)liliy (also called crown)

Napkin folding: lily – folding instructions 1) Place the napkin in front of you 2) Fold the four corners towards the middle, so a triangle forms. 3) Repeat this process again. 4) Turn around the napkin. 5) Fold the four corners now once again to a square. 6) Now get the corners underneath the peaks from back to front. results in beautiful... [more] http://www.fold-a-napkin.com/205/fall/lily/

table peaktable peak

Napkin Folding: table-peak- Folding instructions 1) Place the open napkin in front of you. 2) Fold the top edge down to meet the bottom edge. 3) Fold the top right corner down . 4) Don’t fold this edge a lot. 5) Take from the upper layer of the left side the left bottom corner and pull the corner to the right. In fornt of you there... [more] http://www.fold-a-napkin.com/194/all_napkins/servietten-falten-tafelspitz/

FoxFox

Napkin Folding: Fox – Folding instructions 1) Place the open napkin in front of you. 2) Fold the edge nearest to you to meet the top edge. The closed side of the napkin is at the bottom. . 3) Fold the bottom right corner of the napkin up to the middle right. 4) Fold the top left corner down. 5) Turn the napkin 45 degree and turn the... [more] http://www.fold-a-napkin.com/57/all_napkins/fox/

Pocket BagPocket Bag

Napkin Folding: pocket- Folding instructions 1) Place the open napkin in front of you 2) Fold the edge nearest to you to meet the top edge 3) Fold the right edge to the left edge of the napkin 4) The right side is the closed side of the napkin. 5) Fold the left top corner of the upper layer down to the right bottom side. 6) Turn around the napkin... [more] http://www.fold-a-napkin.com/48/all_napkins/servietten-bestecktasche/

Napkin – KnotNapkin – Knot

Napkin folding: napkin knot 1) Place the open napkin in front of you. 2) Fold the napkin diagonally in the middle to a triangle. 3) Turn the peak down and roll the napkin from the bottom to the top. . 4) Make a knot in the middle of the knot. 5) Decorate the napkin with flowers or other materials  (more)  http://www.fold-a-napkin.com/339/fall/knot/